How To Level A Concrete Floor
Posted by Teri-Ann Fisher on 1st May 2025
Levelling a concrete floor is an important step when preparing for new flooring, whether you're installing tiles, laminate, carpet or hardwood. An uneven floor can cause numerous problems later on, including cracked tiles, creaking floorboards and visible imperfections. Here’s a straightforward guide on how to level a concrete floor.
Step One
Start by preparing the area. Remove all furniture, skirting boards, and floor coverings. Sweep and vacuum the surface to remove dust, dirt, and any loose debris. If there is paint, adhesive or any other material on the floor, it may need to be removed with a floor grinder or a suitable chemical stripper to ensure a good bond with the levelling compound.
Step Two
Next, check for moisture. Concrete floors should be dry before applying any levelling compound. Use a moisture meter if necessary. If moisture levels are too high, you may need to install a damp-proof membrane or use a moisture barrier product.
Step Three
Once the floor is clean and dry, inspect it for cracks or holes. These should be repaired with a concrete filler or patching compound. Allow any repairs to cure fully according to the manufacturer’s instructions before moving on. Assess the level of the floor using a long spirit level or a laser level. Mark high and low spots with chalk or a marker. This will help you determine how much levelling compound is needed and where to apply it more heavily.
Step Four
Before applying the levelling compound, use a primer suitable for concrete. This helps the compound bond effectively to the surface. Pour the primer onto the floor and spread it evenly using a roller or brush. Allow it to dry completely, usually for a few hours.
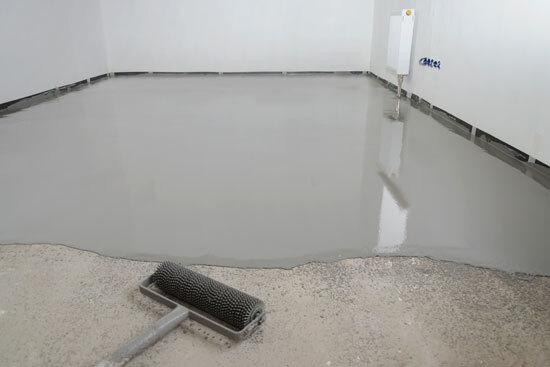
Step Five
Choose a self-levelling compound suitable for the depth you need to correct. Some compounds are better for shallow fills while others are designed for deeper levelling. Mix the compound in a clean bucket following the manufacturer's instructions. Use a mixing paddle attached to a power drill to achieve a smooth, lump-free consistency.
Step Six
Pour the mixed compound onto the floor starting at the lowest point. Use a smoothing trowel or gauge rake to spread the compound evenly across the surface. The compound will naturally find its level but working it with a tool helps ensure full coverage. Work quickly, as self-levelling compounds begin to set rapidly.
Step Seven
Allow the compound to dry fully. Drying times vary depending on the product used and the depth applied, but it typically takes 24 to 48 hours before the surface can be walked on or have flooring installed. Once dry, check the surface with a spirit level. If there are still uneven areas, a second application may be necessary. If the floor is smooth and level, it is ready for the next stage of your flooring project.
Levelling a concrete floor can be a DIY task for those with basic skills, but it is always best to consult a professional, such as ourselves, to ensure that you achieve the desired results first time.